This section is only for users running AccountEdge (Network edition). If you are using AccountEdge Network Edition, refer to the equivalent procedure in the AccountEdge Network Edition Implementation Guide.
To activate TCP/IP on a Mac OS X host or workstation
note : Seek expert assistance
|
2
|
|
3
|
In the Show field, select Built-in Ethernet for a cabled network or select Airport for a wireless network, and then click the TCP/IP tab.
|
|
▪
|
If addresses are dynamically assigned, select Using DHCP in the Configure field. In the DHCP Client ID field, type the name by which the computer is to be recognised.
|
|
▪
|
Otherwise, select Manually in the Configure field. In the IP Address field, type the IP address, for example, 10.24.5.253.
|
|
5
|
If you set the address manually, in the DNS Servers text field, type the IP address of the LAN’s primary DNS server on the first line and those of secondary DNS servers—if there are any—one to a line on the remaining lines.
|
|
6
|
Click Apply Now. If addresses are dynamically assigned, the DHCP server then dynamically assigns an IP number to the computer, and the IP Address, Subnet Mask and Router fields are updated.
|
To create a shared user account on the Mac OS X host
|
2
|
|
3
|
Click the (+) button.
|
|
4
|
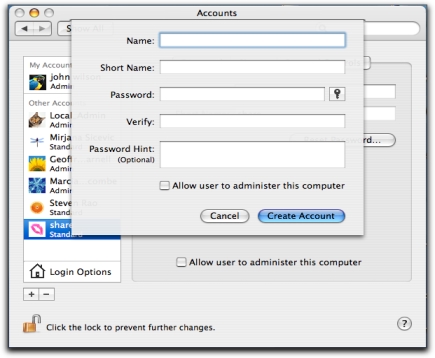
Complete the fields in the Password tab.
|
 |
|
|---|---|
|
Type share.
|
|
|
Type share.
|
|
|
5
|
If the user is not an administrator, deselect the Allow user to administer this computer option in the Security tab.
|
A new user account called share is created. The home folder of the share user is located at /Users/share and contains a folder called Public, that is, /Users/share/Public. This Public folder is where you will place new company files so that they can be accessed by any workstation on the network.
|
6
|
Close the Accounts window and log out of the computer.
|
|
9
|
|
10
|
|
11
|
To share a Public folder on the Mac OS X host
|
2
|
Launch the System Preferences application and click the Sharing icon. The Sharing control panel appears.
|
|
3
|
Click the Services tab.
|
|
4
|
In the Select a service to change its settings list, select the Personal File Sharing option. The Start button changes to Stop after a pause.
|
