Workstations are Windows computers that access a company file stored on another computer, referred to as a host computer. Accessing the remote company-file folder on the host requires you to complete these procedures for each Windows workstation on the local area network (LAN). This process is also known as mapping network drives.
|
1
|
In Files Explorer, open Network.
|
|
2
|
|
3
|
|
4
|
In the Map Network Drive window, accept the proposed drive letter or choose another and click OK. If access to the folder is password protected, a logon window may appear. If so, type the password and click OK.
|
In Files Explorer, the Company_Files folder now appears as a network drive under Computer. For example, you might see the shared folder listed as ‘Company_Files on 'Hongs-pc' (V:)’.
|
5
|
Open the shared Company_Files folder to see the shared company file in it.
|
|
1
|
Select Network from the Windows start menu.
|
|
2
|
Display the host computer’s files in the window and locate the Company_Files folder.
|
|
3
|
Right-click the Company_Files folder and click Map Network Drive. The Map Network Drive window appears.
|
|
4
|
Accept the proposed drive letter or choose another, select the Reconnect at logon option, and click Finish. If access to the folder is password protected, a logon window may appear. If so, type the password and click OK.
|
In Windows Explorer, the Company_Files folder now appears as a network drive under Computer. For example, you might see the shared folder listed as Company_Files on 'Hongs-pc' (V:).
|
5
|
Open the shared Company_Files folder. You should be able to see the shared company file in it.
|
|
1
|
In Windows Explorer, open Network Neighborhood (or My Network Places). You can also double-click the Network Neighborhood (My Network Places) icon on the desktop.
|
|
2
|
|
a
|
Expand Entire Network.
|
(In Windows XP Home, open My Network Places, click Add a network place and complete the Add Network Place wizard.)
|
b
|
Expand Microsoft Windows Network.
|
|
e
|
If a Connect to hostName window appears, complete the User Name and Password fields, select the Remember my password option and click OK. You should now be able to see the Company_Files folder.
|
|
3
|
|
4
|
In the Map Network Drive window (or wizard), accept the proposed drive letter or choose another, select the Reconnect at logon option, and click OK (Finish). If access to the folder is password protected, a logon window may appear. If so, type the password and click OK.
|
In Windows Explorer, the Company_Files folder now appears as a network drive under My Computer. For example, you might see the shared folder listed as ‘Company_Files on 'Hongs-pc' (V:)’.
|
5
|
Open the shared Company_Files folder to see the shared company file in it.
|
|
1
|
Right-click an empty area of the desktop and choose New and then Shortcut. The Create Shortcut wizard appears.
|
|
2
|
Type the path to the your AccountEdge software file in the Command line field (or in the Type the location of the item field) and click Next. Alternatively, you can click Browse and navigate to and select the program file, and then click Next.
|
|
3
|
On the next page, either accept the proposed name for the shortcut or type your preferred name in the Select a name for the shortcut field (or the Type a name for this shortcut field), and click Finish.
|
|
4
|
|
5
|
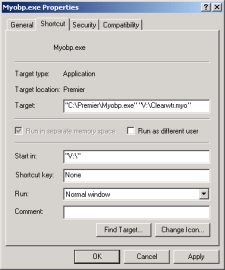
Click the Shortcut tab. The Target field displays the location of the AccountEdge program you entered in step 2 above.
|
|
6
|
[Windows 2000 and XP users only] Enclose the location of the program file in double quotation marks (“): "C:\AccountEdge\AccountEdgep.exe" for example.
|
|
7
|
In the Target field, type a space after the closing quotation mark (“), and then type the location of the company file, including the .myo file extension.
|
[Windows 2000 and XP users only] The path to this location should also be enclosed in its own quotation marks, for example, "C:\AccountEdge\AccountEdgep.exe"
|
8
|
Copy the location of the company file from the Target field, minus the name of the company file, and paste it into the Start in field, for example “V:\” as shown below .
|
|
9
|
|
11
|
Repeat from step 1 on each workstation that needs access to the company file.
|
