Task 3: Select and edit paychecks
The Select & Edit Paychecks window displays the recurring pay details and the timesheet amounts (if applicable) for employees who are paid according to the selected pay frequency.
|
2
|
If you want to view the details of your employee pays, click Preview Pay Details. The Payroll Verification reports appears.
|
|
3
|
If you need to change the pay details for an employee, click the zoom arrow (
 ) next to an employee’s name. In the Pay Employee window that appears, you can: ) next to an employee’s name. In the Pay Employee window that appears, you can: |
You can edit an employee’s timesheet hours in the Pay Employee window. However, any timesheet adjustments you make here will not update hours entered on timesheets, timesheet reports or, if you record time‑billing activities, activity slips.
|
1
|
In the Select & Edit Paychecks window, click the zoom arrow (
 ) next to the employee’s name. The Pay Employee window appears. ) next to the employee’s name. The Pay Employee window appears.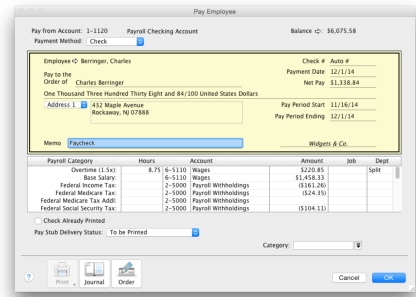 |
|
2
|
Change the hours worked for the applicable wage categories and press Tab. The payroll category amounts are calculated automatically and displayed in the Amount column.
|
|
3
|
|
4
|
Repeat from step 1 above for each employee whose hours you want to change.
|
|
1
|
In the Select & Edit Paychecks window, click the zoom arrow (
 ) next to the employee’s name. The Pay Employee window appears. ) next to the employee’s name. The Pay Employee window appears. |
|
2
|
In the Hours column for the appropriate wage category, type the number of sick or vacation hours and press Tab.
|
|
▪
|
If you have set up this wage category to automatically adjust the employee’s base pay details, the amount for this wage category is calculated and the Base Hourly (or Base Salary) wage category details are adjusted.
|
Before base pay details can be automatically adjusted, you need to select the Automatically Adjust Base Hourly or Base Salary Details option in the Wages Information window for the wage category. For more information see ‘Wages Information window’
|
▪
|
If you have not set up this wage category to automatically adjust base pay details, reduce the number of hours allocated to the Base Hourly wage category or the amount allocated to the Base Salary wage category by the amount entered for the vacation or sick pay payroll category.
|
For example, if you are recording eight hours of vacation leave for an hourly employee, type 8 in the Hours column next to the Vacation Pay payroll category and press Tab. The hours recorded for the Base Hourly category are automatically reduced by 8 and the amount is appropriately adjusted.
|
a
|
Click the zoom arrow (
 ) in the Hours column next to the appropriate wage category. The Leave Tracking Information window appears. ) in the Hours column next to the appropriate wage category. The Leave Tracking Information window appears. |
|
c
|
Click OK.
|
|
4
|
Before you enter these details, the wage categories you intend to use should already be assigned to the employee. For information on assigning a wage category to an employee, see ‘Entering employee payroll information’.
|
1
|
In the Select & Edit Paychecks window, click the zoom arrow (
 ) next to the employee’s name. The Pay Employee window appears. ) next to the employee’s name. The Pay Employee window appears. |
|
2
|
In the Hours or Amount fields next to each appropriate wage category, type the hours or amounts you want to record.
|
|
3
|
|
1
|
In the Select & Edit Paychecks window, click the zoom arrow (
 ) next to the employee’s name. The Pay Employee window appears. ) next to the employee’s name. The Pay Employee window appears. |
|
2
|
Type or select the job number in the Job column corresponding to the payroll category.
|
|
a
|
Click in the Job column corresponding to the appropriate payroll category and then click the search icon ().
|
|
b
|
In the Allocate Jobs window that appears, click the select column () next to each applicable job and type the amount in the Amount column.
|
|
c
|
|
4
|
You can also assign a default job to an employee in the Recurring Pay section of the employee’s card. For more information, see ‘Entering employee payroll information’.
|
1
|
In the Select & Edit Paychecks window, click the zoom arrow (
 ) next to the employee’s name. The Pay Employee window appears. ) next to the employee’s name. The Pay Employee window appears. |
|
2
|
Type or select the department number in the Dept column corresponding to the payroll category.
|
|
a
|
Click in the Dept column corresponding to the appropriate payroll category and then click the search icon.
|
|
b
|
In the Allocate Departments window that appears, click the select column next to each applicable department and type the amount in the Amount column.
|
|
c
|
|
4
|
You can also assign a default department to an employee in the Recurring Pay section of the employee’s card. For more information, see ‘Entering employee payroll information’. You can also select a department for the employee card in the Card Details tab.
|
1
|
In the Select & Edit Paychecks window, click the zoom arrow (
 ) next to the employee’s name. The Pay Employee window appears. ) next to the employee’s name. The Pay Employee window appears. |
|
2
|
Click Banking Details and enter the required bank details in the Banking Details window that appears.
|
|
3
|
Click OK. A confirmation message appears.
|
|
5
|
For more information on entering an employee’s banking details, see ‘Entering employee payroll information’.
|
▪
|
