Step 1: Setup tax codes
|
1
|
|
2
|
|
3
|
Select the Detail Account option.
|
|
4
|
Select the Liability type from the Account Type list. The Account Classification field changes according to the selection you make. For more information on account classifications, see ‘Account classifications and types’.
|
|
5
|
Enter a four-digit number for the account in the Account Number field. The number must be unique within each account classification. Be sure to keep the accounts in numerical order.
|
|
6
|
Press Tab and type a name for the account.
|
|
7
|
Click the Details tab.
|
|
8
|
If you want, type a brief description of the account in the Description field.
|
|
9
|
Click OK when you have finished. The account you created now appears in your accounts list.
|
If you have multiple sales tax liability accounts, you can group them together using a header account that will keep a total of all accounts in the group. You group accounts by first creating the Header account, then indenting the accounts located below a header account. Be sure to keep the accounts in numerical order.
|
1
|
|
2
|
|
3
|
To create a header account, select the Header Account option.
|
|
5
|
|
7
|
Click Down to group the account with the header located above it.
|
|
1
|
|
2
|
|
3
|
|
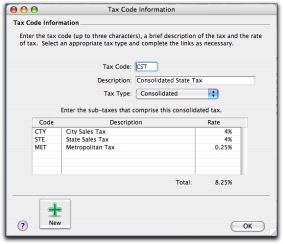
Enter a description, type, and rate. If you selected Consolidated as the Tax Type, see ‘Consolidated tax codes’ above.
|
|
|
If the Tax Type is Sales Tax, select the linked account for tax collected. If the Tax Type is Import Duty, select the linked account for accrued duty. Select a card that you want to link to this tax code, if applicable.
|
|
|
5
|
Click OK when you have finished. The new tax code you created will now appear in your tax codes list.
|
|
1
|
Open the tax code you want to edit in the Tax Code Information window.
|
|
1
|
Open the tax code you want to delete in the Tax Code Information window.
|
|
2
|
