|
▪
|
In the Enter Activity Slip window. This is the recommended method for single activity slip entry that needs to be billed immediately. See ‘To create a time billing invoice using the Enter Activity Slip window’
|
|
▪
|
In the Prepare Time Billing Invoice window. This is the recommended method because the full details of activities and activity slips are recorded. See ‘To create a time billing invoice using the Prepare Time Billing Invoice window’
|
|
▪
|
In the Sales window. Use this method if you don’t need to record details of activities and activity slips or track work in progress. ‘To create a time billing invoice in the Sales window’
|
The Enter Activity Slip window allows you to enter the details of the activity slip and record a Sales - New Time Billing Invoice. When you choose to Create Invoice, the details from the activity slip are entered in an invoice automatically.
|
1
|
Go to the Time Billing command center and click Enter Activity Slip. The Enter Activity Slip window appears with the Activity Slip tab select.
|
|
2
|
Enter the Employee/Vendor name, Date, Customer, Activity, Billing Units, Billing Rate, Job and Notes (if needed). If you have entered notes specific to this activity slip and would like to use these notes on a invoice, select Use Notes instead of Activity Name/Description when creating an Invoice.
|
|
3
|
Click Create Invoice. The activity slip is recorded and the Sales - New Time Billing window appears with the details of the activity slip automatically entered in the time billing invoice.
|
|
4
|
If you have selected the I Include Items on Time Billing Invoices option in the Preferences window, you can also enter items on this invoice. See ‘Setting time billing preferences’
|
|
▪
|
the date in the Date field
|
|
▪
|
|
▪
|
the item number in the Activity field
|
|
▪
|
the price of the item in the Rate field
|
|
▪
|
|
5
|
|
▪
|
Save the invoice as a recurring template. Click the Action menu and select Save As Recurring Sale. Enter the necessary information about the template in the Edit Recurring Schedule window and click Save. For more information about recurring transactions, see ‘Recurring transactions’.
|
|
▪
|
|
▪
|
Print and record the invoice. Click Print and then choose the form you want to use for this invoice. For more information about printing invoices, see Sending forms. Note the invoice is recorded before it is printed.
|
The Prepare Time Billing Invoice window allows you to enter and adjust the billing information for activity slips. As you make changes in the Prepare Time Billing Invoice window, your activity slip records are updated automatically.
|
1
|
Go to the Time Billing command center and click Prepare Time Billing Invoice. The Time Billing Customers window appears.
|
If you charge your customers for both activities and items on a single invoice, you need to select the I Include Items on Time Billing Invoices option in the Preferences window. See ‘Setting time billing preferences’.
|
2
|
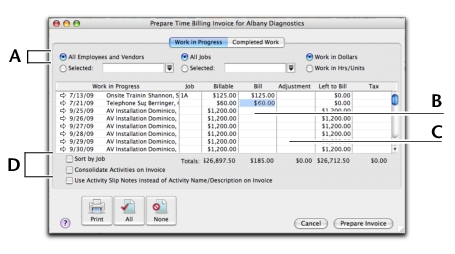
Find and select the customer for whom you want to create a time billing invoice and click OK. The Prepare Time Billing Invoice window appears, listing all the open activity slips for the selected customer.
|
 |
||
|
Type the amount or number of hours you want to bill for each activity slip here. Any activity slip with 0.00 units or $0.00 in the Left to Bill column is considered billed in full.
|
||
|
3
|
Click Prepare Invoice. The Sales - New Time Billing window appears with the details of the time billing invoice.
|
|
4
|
If you have selected the I Include Items on Time Billing Invoices option in the Preferences window, you can also enter items on this invoice. See ‘Setting time billing preferences’
|
|
▪
|
the date in the Date field
|
|
▪
|
|
▪
|
the item number in the Activity field
|
|
▪
|
the price of the item in the Rate field
|
|
▪
|
[optional] the job number in the Job field.
|
|
▪
|
the appropriate tax code in the Tax field.
|
|
5
|
|
▪
|
|
▪
|
Print and record the invoice. Click Print and then choose the form you want to use for this invoice. For more information about printing invoices, see Sending forms. Note that the invoice is recorded before it is printed.
|
|
▪
|
Save the invoice as a recurring template. Click Save as Recurring. Enter the necessary information about the template in the Edit Recurring Schedule window and click Save.
|
Note that no activity slips are created when you use the recurring sale in the future. Also, recording the recurring sale will not update the activity slips you used to create the invoice in the Prepare Time Billing Invoice window.
If you use this method to create a time billing invoice, no activity slip records will be created. Most time billing reports are based on activity slip records, therefore, if you want to print time billing reports, you should create activity slips and then use the Prepare Time Billing Invoice window to create the invoice.
|
1
|
|
2
|
In the Customer field, type or select the customer you want to invoice.
|
|
3
|
|
4
|
|
▪
|
the date the activity was performed in the Date field
|
|
▪
|
the number of units or hours being billed in the Hrs/Units field
|
|
▪
|
|
▪
|
|
6
|
If you have selected the I Include Items on Time Billing Invoices option in the Preferences window, you can also enter items on this invoice. See ‘Setting time billing preferences’
|
|
▪
|
the date in the Date field
|
|
▪
|
|
▪
|
the item number in the Activity field
|
|
▪
|
the price of the item in the Rate field
|
|
▪
|
|
7
|
|
▪
|
Save the invoice as a recurring template. Click Save as Recurring. Enter the necessary information about the template in the Edit Recurring Schedule window and click Save. For more information about recurring transactions, see ‘Recurring transactions’.
|
|
▪
|
|
▪
|
Print and record the invoice. Click Print and then choose the form you want to use for this invoice. For more information about printing invoices, see Sending forms. Note that the invoice is recorded before it is printed.
|
