Jobs can be set up to track income and expenses related to specific jobs. This is particularly useful when multiple jobs are performed for a single customer. When you enter a transaction, the appropriate job number can be assigned to each individual amount. This enables you to associate several jobs with the various amounts in a single transaction.
For example, if a purchase includes parts for three customers, you could specify each of the three jobs to which that purchase relates. A profit and loss statement can then be prepared for each job.
|
1
|
|
2
|
|
3
|
In the Job Number field, type a code for the job and press Tab.
|
|
4
|
Enter additional information about the job, such as a job name and description.
|
|
5
|
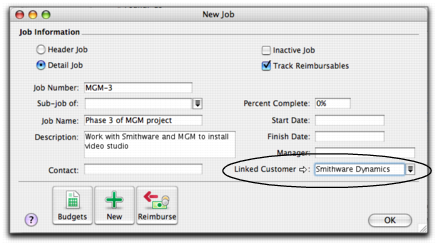
You can view details of all jobs linked to a customer in the Jobs tab of the customer’s card.
|
6
|
|
7
|
Review the list of jobs you have created. If you need to change the details of a job, select the job and click Edit.
|
If you started using your AccountEdge software while a particular job was in progress, you can create the job and then enter any account activity generated by the job so far in the Job Opening Balances window.
You can enter opening balances only for detail jobs. Header jobs take their balances from the detail jobs below them.
|
1
|
Go to the Setup menu, choose Balances, then Job Opening Balances. The Job Opening Balances window appears.
|
|
2
|
In the Job Number field, type or select the job number of the job for which you want to enter an opening balance and press Tab.
|
|
3
|
In the Opening Balances column, type the opening balance for the job.
|
|
4
|
Repeat from step 2 for each job with an opening balance.
|
|
5
|
Click OK when you have finished.
|
|
■
|