The scrolling list in the middle of the Purchases window is where you enter details of what you are buying. In this area, you will enter item numbers, descriptions, account numbers (or account names, depending upon your selection in the Preferences window), and other information about your transaction.
One row in the scrolling list is one line item of the transaction. You can enter as many line items for a purchase as you want. The fields that appear in the scrolling list differ according to the type of purchase you are creating.
 |
||
|
Press tab and select an item from your item list.
|
||
|
If you have purchased the item before or you have entered a standard cost in the Buying Details tab of the Item Information window, the price of the item appears automatically. You can change this if you want.
|
||
|
If the item is taxable, click the Tax column.
|
||
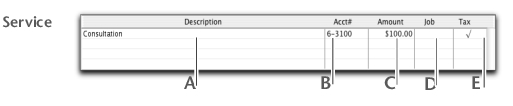
The following illustration shows the fields for purchase with a Service layout and a Bill status. These fields also apply to the Professional and Miscellaneous layout.
 |
||
|
The account to assign to the purchase. Press tab to display the accounts list from which you can choose an account. This should be an expense or cost of sales account. You should not select your accounts payable account for vendor purchases.
|
||
|
If the item is taxable, click the Tax column.
|
||
